You can use this conversation element to take the conversation flow to a new element. This element is mostly used in scenarios, where you have to configure a conversation flow and want to add the same flow in another part of your script.

Why use a "Jump" Element?
Let's say, you have a reply script that looks something like this. 
In this script, we have a clicker at the start that splits the reply flow into two paths: A and B. However paths A and B are almost identical. Path B as only one additional element (Send Message) and after that message path B should have the same script as path A.
We can achieve it by copying all the path A scripting blocks into path B, but this method does not seem that optimal, moreover, if we have to make any changes in path A, we would have to edit path B also.
The other method is to is add the "Jump" conversation element in path B, so that once the "Send Message" is used (which is the only additional element in path A), the Jump element re-routes the scripting flow to path A, as shown below.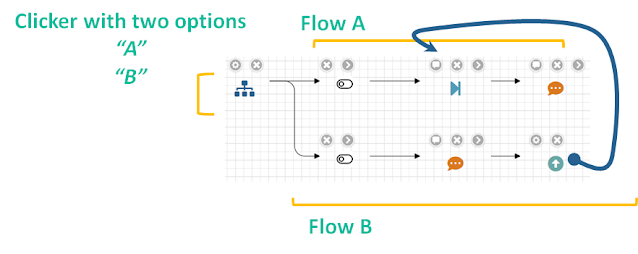
How to configure?
You can add the "Jump" conversation element by clicking on the up-arrow icon in the bot palette as shown below.
Note: 'Jump' Conversation should be the last element in a reply flow. If you add this element as the first element in your flow, the chatbot will not work properly.

Once the 'Jump' element is added, click on the setting button

On the settings page, select the "ID" of the element when you want the 'Jump' element to route the flow.
How to find 'ID' of the routed-to element?
You can find the 'ID' of the routed-to element ( the conversation element where you would like your reply flow to jump to) by clicking on the settings page of that element and click on the element icon on the top of the dialog box as shown.
As an example, let's say you have a reply flow script where you want the flow to jump to a conversation element "Clickers". In order to find the ID of that clicker element, click on the setting button of that element (clickers) and hover your mouse over the clicker icon on the settings dialog (unfortunately, this will only work on devices with mouse/pointing device).

In the picture you can see that the ID of the clicker element ends with 26bd. Now click the setting of the "Jump" element and select element that ends with 26bd

Which elements you can select in the 'Jump' setting?
You can only 'Jump' to the following elements
- Clickers
- Send message with pause
- Display catalogue
- Appointment scheduler
- Save user input
Comments
Post a Comment